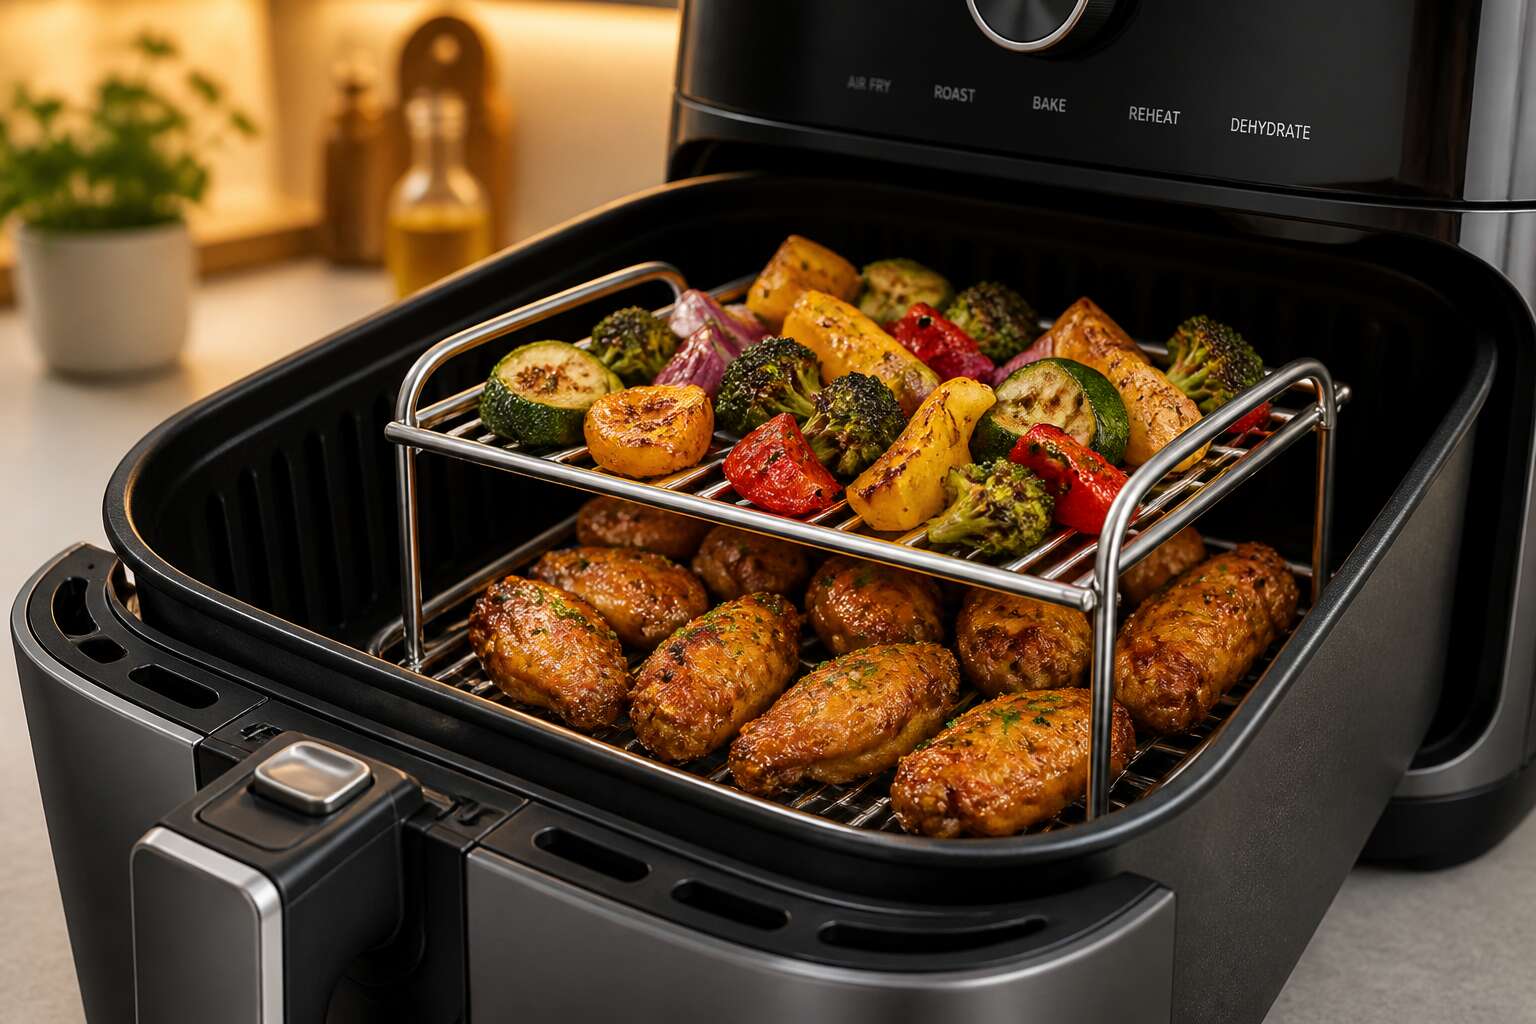
Maximizing Cooking Capacity with Stacked Layers
How a Multi-Tier Rack Doubles Your Batch Size
The airfryer rack in a stacked configuration transforms a modest appliance into a vertical kitchen architecture. When I first used one, the basket’s limitations became obvious, a single layer of chicken pieces barely fed three people. A multi-tier rack changes that arithmetic. The hot air circulates through the gaps, reaching each shelf with equal intensity, so the top batch crisps while the lower batch roasts.
Consider the practical gains:
- Two layers of wings on a single airfryer rack
- Batch sizes that double without extending cooking time
- Even browning across both shelves
The vertical space inside the machine, often left idle, becomes usable. For a South African household preparing a large gathering, this means less waiting, fewer cycles, and a consistent result across every portion.
Best Practices for Even Air Circulation
The most ignored element in any airfryer rack meal is the air itself. The fan at the top shoves hot air downward, and the way I arrange food on each level decides whether that heat reaches everything or stalls. I rarely stack without leaving a gap between the rack edge and the food; the heat needs that pathway upward, and I have learned to respect it! Cramped pieces form a barrier, and the result is a lower shelf that roasts while the upper shelf steams.
The goal is not symmetry. It is space for the heat to travel. On a busy Sunday, when I load two layers of chops and vegetables, I ensure the top shelf sits below the heating coil with room to spare, and that the lower layer is not hiding behind a solid wall of potato. Every piece should have a sliver of air beside it. The fan moves a set volume of air, and no airfryer rack can compensate for a layer that blocks its own airflow.
Avoiding Overcrowding: Spacing Guidelines
In South African kitchens, the airfryer rack has become a quiet workhorse. But capacity is not about piling every chop and potato slice onto one tray. The true measure is how much food you can place on each level without turning the basket into a crowded lift.
The rule I follow with any airfryer rack is simple: leave a finger’s width between pieces on every layer. This spacing lets heat find each surface. The upper tier needs clearance from the heating element, and the lower tier needs breathing room from the shelf above.
- Leave 1 cm between small items like chicken wings or fish fingers.
- Keep 2 cm around larger cuts such as marinated steaks or whole vegetables.
- Never let the top layer rise above the rack’s rim.
These numbers seem small, yet they unlock the rack’s real capacity. A unit with three stable levels can hold a full dinner. When each layer follows these guidelines, you get generous yield without the soggy middle that overcrowding brings.
Cooking Different Foods Simultaneously Without Flavor Transfer
Stacking turns an airfryer rack into a multi-tier cooking system! The top tier can hold delicate fish fillets while the bottom layer handles root vegetables. No single shelf bears the burden of the entire meal.
Flavour transfer remains the quiet concern when cooking dissimilar foods together. A rack with gaps between tiers prevents juices from one level dripping onto another. I find that using separate trays or lining the lower basket with foil creates a barrier. The air circulates, yet the smells stay distinct.
Consider these combinations:
- Marinated chicken above, plain potatoes below
- Herb-crusted fish above, steamed greens beneath
- Seasoned veggies on one level, neutral rice on another
Each layer cooks by the same hot air but retains its own character. The stacked design of an airfryer rack gives South African home cooks a way to serve multiple dishes from one machine.
Selecting the Right Material for Safety and Durability
Stainless Steel vs. Non-Stick Coated Racks
In my kitchen, a stainless steel rack has outlived three non-stick models. I have watched flaking coatings ruin a dinner. Non-stick surfaces release food easily, yet they scratch under metal tongs. Stainless steel resists bending and does not corrode. The choice comes down to your cooking style.
Consider this:
- Stainless steel endures high heat and abrasive tools.
- Non-stick coatings need soft sponges and silicone utensils.
That difference affects how you clean and care for your airfryer rack. I keep both types! Each has a place, and each requires a different approach.
Heat Resistance and Maximum Temperature Ratings
Your airfryer rack faces temperatures that warp cheap metal and compromise safety. In South Africa, where load shedding causes repeated power surges, the thermal stress on that rack multiplies. A rack rated for 180°C may survive a single session, but hundreds of heating and cooling cycles test the material’s true durability.
The maximum temperature rating printed on the box reveals one dimension. That number indicates where deformation starts, not where structural failure begins. Cold-rolled steel maintains integrity at 240°C. Aluminum alloys lose rigidity past 200°C, especially when the rack is lifted while still hot.
Consider these heat resistance parameters:
– Maximum rated temperature for continuous use
– Behaviour under rapid temperature changes
– Oxidation resistance at sustained high heat
These factors determine whether your airfryer rack remains dependable after months of heavy cooking. The rating matters more than the price tag.
Food-Grade Certifications to Look For
When you shop for an airfryer rack in South Africa, the material tells the real story. Food-grade 304 stainless steel resists corrosion and won’t leach into your meal. Certifications like FDA approval or EU food contact compliance confirm the steel meets strict safety standards. I always check for these markings before recommending a product.
A cheap airfryer rack might look identical on the shelf, but the alloy composition differs. Some contain nickel or chromium that can migrate at high temperatures. The certification label protects you from that risk.
Consider these checks:
– Verify the stamp for food-grade 304 or 430 steel
– Confirm the coating is free from PFOA and BPA
– Check for SABS approval, which matters for South African buyers
The right airfryer rack should feel solid and carry clear markings. If the packaging lacks certification details, treat that as a warning.
Comparing Wire Gauges and Build Sturdiness
Thicker wire doesn’t automatically mean a better airfryer rack. The gauge affects how evenly heat conducts through the airfryer rack and how long it holds its shape. A flimsy rack flexes under a heavy load of marinated meat or frozen chips. That movement blocks airflow and causes uneven cooking.
I look for 8 to 10 gauge wire for everyday use. It feels rigid when you twist it between your hands. The weld points matter too. Smooth, continuous welds indicate proper construction, while rough spots suggest weak joints.
The signs of quality are visible and tactile:
- Bend the rack slightly in the store. It should spring back without creaking.
- Run your finger along the edges. Burrs mean poor finishing.
The material and build work together. A thick wire with weak welds fails faster than a thinner rack with solid joints.
Cleaning and Maintenance Considerations for Each Material
Salt-laden air along the South African coast corrodes cheap metal within months. The airfryer rack must resist more than heat; it endures humidity, acidic marinades, and daily scrubbing. 18/10 stainless steel offers a chromium barrier that blocks rust and pitting. Aluminium weighs less, but it warps and reacts with acidic foods. Non-stick racks require deliberate care:
Use only soft sponges and warm soapy water.
Avoid metal utensils and abrasive powders.
Dry immediately after washing to prevent moisture damage.
Each material responds differently to neglect. Stainless tolerates rough handling, while non-stick surfaces fail quickly under abrasion. Choose according to your kitchen habits, not the price alone.
The Science of Perfectly Crispy Results with a Rack
Elevating Food for Better Hot Air Flow
When you suspend food on an airfryer rack, you change how heat behaves. Hot air rises, strikes the underside of the food, and swirls upward, pulling moisture from each surface. This vertical lift separates a reheated meal from a truly crispy one.
The rack interrupts airflow just enough to increase its velocity around the food. Faster air transfers heat more aggressively, triggering the Maillard reaction at a slightly lower temperature. The result is a golden exterior without a dried interior.
Several variables influence this effect:
– The height of the rack above the basket floor
– The open surface area of the rack’s mesh
– The distance between individual pieces of food
Each variable alters how much hot air reaches your meal.
How Racks Help Render Excess Fat and Oil
Oil that cannot escape becomes steam. Inside an airfryer, food resting on its own rendered fat cooks unevenly. An airfryer rack lifts the food and lets that fat drain through the mesh. The drips fall to the base plate, away from the surface.
This draining changes how heat interacts with the food:
– The exterior stays dry enough to crisp
– The interior retains its moisture
– The juices concentrate instead of diluting
I have seen this with chicken thighs and lamb chops. The fat renders faster, the skin tightens, and the underside stays firm. An airfryer rack separates food from grease and gives the heat a clean path to every side. The result is a meal that tastes like it came from a professional kitchen, not a countertop appliance!
Adjusting Cooking Times and Temperatures for Raised Surfaces
The airfryer rack transforms how heat reaches food, but it also changes your timing. On a raised surface, hot air strikes the underside first, creating a rapid crust that locks in moisture. This faster surface reaction means you often need to reduce the temperature by five to ten degrees Celsius. The cooking time may also shorten by several minutes. I have watched identical chicken wings finish unevenly when I ignored this shift.
For raised surfaces, consider these adjustments:
- Decrease temperature to prevent exterior burning
- Check doneness five minutes earlier than usual
- Rotate the basket halfway for consistent exposure
The rack accelerates browning because it eliminates the buffer of pooled oil. That same efficiency demands your attention!
Using Racks for Roasting Vegetables and Meats Evenly
Two identical portions of butternut, one resting on the airfryer rack and one sitting on the flat basket, will tell you everything about the physics of convection. The raised version develops a caramelised edge and a dry, blistered skin. The other steams in its own exuded juices. This is the difference between roasting and braising, and the airfryer rack, quite simply, selects the former.
The secret lives in the escape route. When dense slices of sweet potato or wedges of firm pear lie flat, their bottoms make contact with a hot surface that cannot breathe. Moisture accumulates, and the texture turns sodden. A rack lifts the food into the airstream, allowing every exposed millimetre to shed its moisture rapidly. The surface dehydrates, then sugars and proteins perform their browning magic.
– Meats develop a crackling, puffed exterior while the interior remains notably succulent.
– Vegetables shrink less and maintain their structural integrity instead of collapsing into a heap.
– The need for excessive oil drops dramatically because the circulating heat does the work.
This evenness of cooking stems from the geometry of the air path. The fan produces a vortex that moves around the food’s perimeter. On a flat surface, the airflow cannot reach the underside. The airfryer rack captures that lost velocity, converting it into browning. For a whole chicken or a thick fillet of snoek, this uniform exposure means the centre comes up to temperature without the exterior turning dark and tough. That is the true worth of the accessory, turning a decent meal into one with proper textural contrast.
Creative Uses for an Airfryer Rack Beyond Frying
Dehydrating Fruits and Herbs in a Single Layer
Your airfryer rack handles dehydration with ease. Place fruit slices or herb sprigs in a single layer to dry evenly. The mesh lets moisture escape from all sides, so you skip the endless flipping. Crank the heat to a gentle 55 degrees Celsius and wait. Within hours, you get chewy mango pieces, crisp sage, or brittle lemon zest. This method works with soft fruits like kiwi and papaya, common in South African markets. Suitable options include:
- Guava rounds
- Mint leaves
- Chilli halves
- Orange peels
Dried goods store well in glass jars. They add punch to stews, teas, and baking. It quietly replaces a dedicated dehydrator, saving counter space and money.
Reheating Multiple Leftovers at Once
Reheating last night’s meal often ruins texture. The airfryer rack gives each component its own space. I place a ceramic bowl of curry on the base and rest two rotis on the mesh above. Heat moves around both, warming the sauce while the flatbread stays supple. For a fuller plate, arrange these directly on the rack:
- Leftover roasted chicken pieces
- Cold pap slices
- Mini vetkoek
- Grilled mealie kernels
They all reheat in one cycle without merging into a bland stew. A single airfryer rack also keeps fried fish crisp, because the mesh lets trapped steam escape. That makes it a practical tool for midweek eating in Johannesburg, where quick recovery beats slow cooking.
Making Crispy Snacks with Minimal Oil
An airfryer rack gives you a surface that air moves through completely. I use it for snacks that would otherwise go soggy. The mesh lifts food off the base, so oil and moisture fall away instead of pooling.
Try these in one cycle:
- Spiced chickpeas
- Kale leaves
- Thin potato slices
Each one turns crisp after a quick toss in a teaspoon of oil. The mesh prevents steam from collecting underneath, which keeps the exterior crunchy. That’s the real trick for a low oil snack.
Cooling Baked Goods Directly in the Airfryer
Your airfryer rack can handle a job no wire cooling tray manages: cooling baked goods directly in the airfryer. Bake a batch of rusks, switch off the machine, and rest the tray on the rack. The residual heat and gentle airflow dry the exterior while the mesh lifts the bake off any pooled moisture.
I do this with scones and even small loaves. The rack keeps the bake off the counter, and the enclosed space stops curious pets from meddling.
Storing the Rack: Compact and Space-Saving Tips
The airfryer rack steps into roles most owners never consider. Between batches, it becomes a resting spot for cooked food, keeping it off the counter and letting residual heat escape. It also dries washed herbs or guards a bowl of fermenting dough.
- Rest it across a roasting tin to keep chicken thighs above the juices.
- Balance it over a sink to drain rinsed lentils or samp.
- Set it on the table as a trivet for a hot potjie pot.
Storage requires little effort. I hook mine on the inside of a cupboard door or stand it vertically behind the appliance. For compact flats, slide them beneath the airfryer base.
Compatibility and Fit: Knowing Your Airfryer Model
Measuring Basket Dimensions Before Buying
Airfryer baskets are not a universal size. A rack that fits a 5.5 litre model can topple inside a compact 2.5 litre unit. Measuring your basket diagonally and across the base prevents a wobbly airfryer rack. Use a metal tape measure for accuracy.
Check the internal height as well. Many racks require clearance above the heating element. For square baskets, measure the narrower side. For round baskets, measure the diameter.
Then match your rack to the brand’s airfryer rack range. Common South African models include Philips, Tefal, and Russell Hobbs. Each has distinct clips and feet.
A precise fit keeps food stable and heat airflow consistent.
Universal vs. Brand-Specific Racks: Pros and Cons
Your airfryer’s brand is not a vanity detail. It determines how an airfryer rack behaves under heat. Universal racks promise broad compatibility, but they can shift during cooking. Brand-specific racks use clips and feet matched to your basket’s geometry.
Here is the trade-off:
- Universal: works with multiple baskets, but vertical clearance varies by model.
- Brand-specific: precise fit, smaller selection aftermarket.
In South African kitchens, the difference between Philips, Tefal, and Russell Hobbs clip systems prevents a tippy rack. Measure your basket, then decide. A wobbly fit disrupts airflow and may scratch the nonstick coating. That is a poor return on your investment.
Handling Non-Stick Surfaces Without Scratches
Open your drawer and measure the cooking chamber before you commit to any airfryer rack. The model number on the back of your appliance matters more than any universal claim. A rack shaped for one basket may rest unevenly inside another brand’s chamber.
For non-stick coatings, choose a rack with silicone-tipped feet or a protective edge. Slide it in at a slight angle and let it settle. Never drag it across the surface when the basket is hot.
- Match clip depth and foot height to the ridges in your basket.
- Run an empty test cycle to check stability and airflow.
Keep the protective sleeve that ships with the rack and use it during storage. It prevents scratches where you cannot see them.
Accessorizing with Silicone Ends and Handles
Your airfryer is not a modular appliance. It has no interest in a shiny universal rack. It cares about the exact millimetres of its basket. The model number on the back panel is your only reliable map. Ignore it and the airfryer rack will rattle or tilt.
Silicone ends and handles alter the fit of your airfryer rack, yet they only work with your specific drawer. A handle angled too far forward will jam against the glass. A silicone tip that is too tall will lift the rack above the food line. Test the fit with the basket cold.
Three measurements dictate success:
- Interior width at the top and bottom.
- Depth to the rear heating element.
- Clearance of the front lip when the handle is closed.
Only then does the rack earn its space.




0 Comments